
First of all, we would like to congratulate you on your successful installation of Mumara Campaigns. It’s pretty easy for a mailer to understand what to do next after logging into it for the first time.
Moreover, we have Basic Steps mentioned in the dashboard that could lead to your first broadcast scheduling. Below you can find out how to proceed with the mandatory steps to deploy your very first broadcast.
Table of Contents
- Configure a primary domain
- Navigate to settings -> Branding
- Add a Sending Domain
- Authenticate your Sending Domain
- Tracking Domain
- Add bounce email
- Sending Node
- Import Contacts
1) Configure a Primary Domain
In Mumara, you have the opportunity to keep the application URL and primary domain name different. Like other applications or even Mumara Classic uses the application URL as the main domain name responsible to track emails.
In a couple of cases (e.g. avoiding blacklisting, white-labeling, etc.), you need to keep your application URL out of the tracking loop and yes this is possible in Mumara Campaigns.
Navigate to Settings -> Branding
The first tab you see is for Primary Domain configuration. By default, Mumara puts your application URL in the Primary Domain but you always have the option to edit it however it’s not mandatory if you don’t need to have it on a different domain.
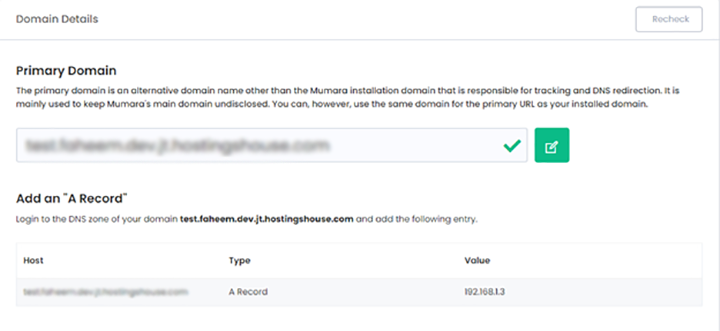
If you replace the primary domain with another domain name, you’ll need to add an “A Record” in the DNS zone for the primary domain and point it to Mumara server IP. Once the “A Record” has been added to the domain’s DNS, it means your primary domain is pointing to the Mumara server but you’ll also need to add the primary domain to your web server (e.g. apache) on the same physical path as of Mumara so they do a proper handshake and propagate.
Once everything has been set up, Mumara Campaigns should pass the result otherwise click on the “Recheck” button to verify if it is resolving properly.
2) Add a Sending Domain
Sending domain is the one that appears in the Mail-From email address when the recipient receives the email. So it’s important to add a sending domain in Mumara and authenticate it by adding a domain key (if Mumara is responsible for signing your messages).
While adding a sending domain, you also have to mention a tracking subdomain that appears in the tracking URLs e.g. hyperlinks, tracking pixels, etc. To propagate the tracking domain, you’ll need to point/redirect it to the Mumara Primary Domain by cname or .htaccess method.
Authenticate Your Sending Domain
If you want Mumara Campaigns to sign messages with a Domain Key and you are sure that your MTA/SMTP provider isn’t signing the messages, then you can enable domain-key signing in Mumara and it will generate a public key for your sending domain.
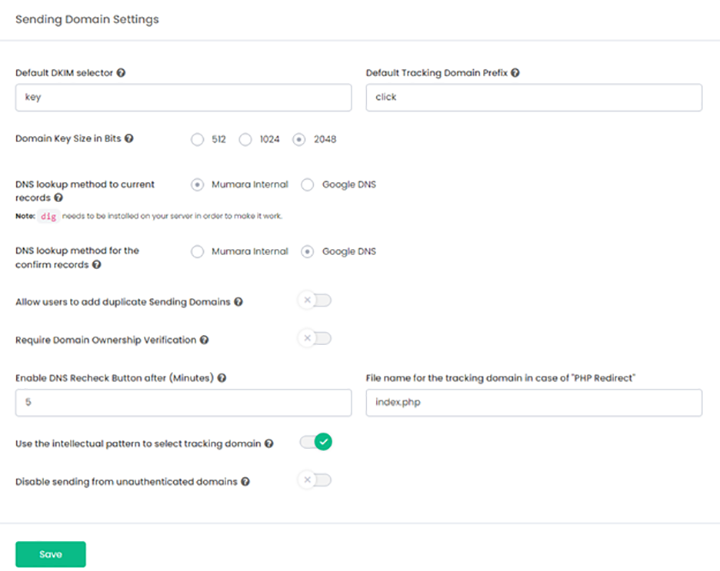
You have an option to change the domain-key selector, by default Mumara puts “key” as the selector and it appears in email headers. You can simply copy the public domain key to your sending domain’s DNS as a TXT record.
Tracking Domain
The tracking domain is a subdomain of your sending domain (e.g. if your sending domain is foo.com then the tracking domain could be track.foo.com) and is responsible to appear in the tracking links.
You can put a redirection using a name record or htaccess method. For cname redirection, insert a cname entry to your sending domain’s DNS as you see in Mumara. For the htaccess method, you need to host the tracking domain somewhere and upload the .htaccess file to the root folder of the tracking domain.
Once your domain key has been inserted and tracking has been configured, click on the “Confirm” button to validate them. If everything is resolving properly, Mumara will give a success message, otherwise, you can always fix it and Recheck later.
3) Add Bounce Email/Mailbox
Bounce email acts as a return path and a mandatory field for the message headers. If no bounce email is defined in message headers, the email doesn’t qualify for delivery. To add a bounce email, you’ll need to authenticate it by giving your IMAP/POP connection details.
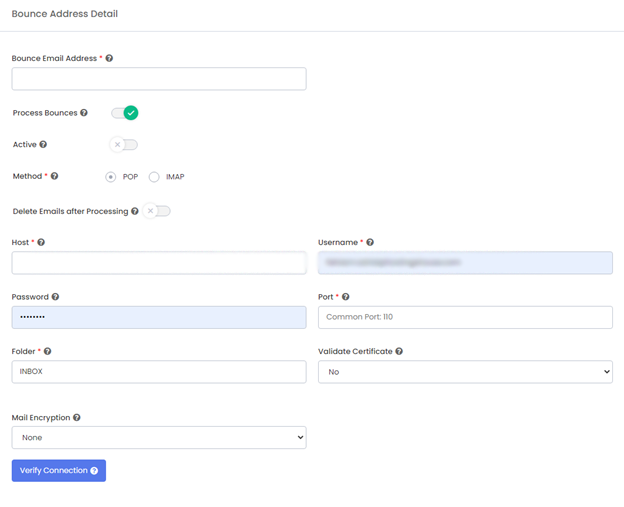
Mumara needs the login details of your bounce mailbox so it can log in to read all bounce reports and flag the associated contact’s status accordingly within your list.
4) Sending Node
A sending node is a carrier that relays your message to the recipient’s mailbox. It can be an SMTP or an ESP (Email Service Provider). We have integrations available with major ESPs i.e. Sendgrid, Mailgun, Amazon SES, or even PowerMTA (more ESPs are being integrated).
If you have an account with any of the listed ESP then you can simply connect it or you can even sign up with them for an instant account. If you are looking to connect an SMTP then add the authentication details and validate the connection.
Make sure you choose the correct/matching Sending Domain and Bounce email here as they will be responsible for qualifying your message.
5) Import Contacts
Once you are done with the above 4 steps, you are all set to send broadcasts. You simply need to create a contact list and import contacts to it before you can schedule a broadcast. Importing process is very simple and it allows you to map the custom fields with your CSV file headers. Once the import has been started, you have the option to navigate away from the page as it runs in the background.
Click for more Email Marketing Blogs.


Add comment